
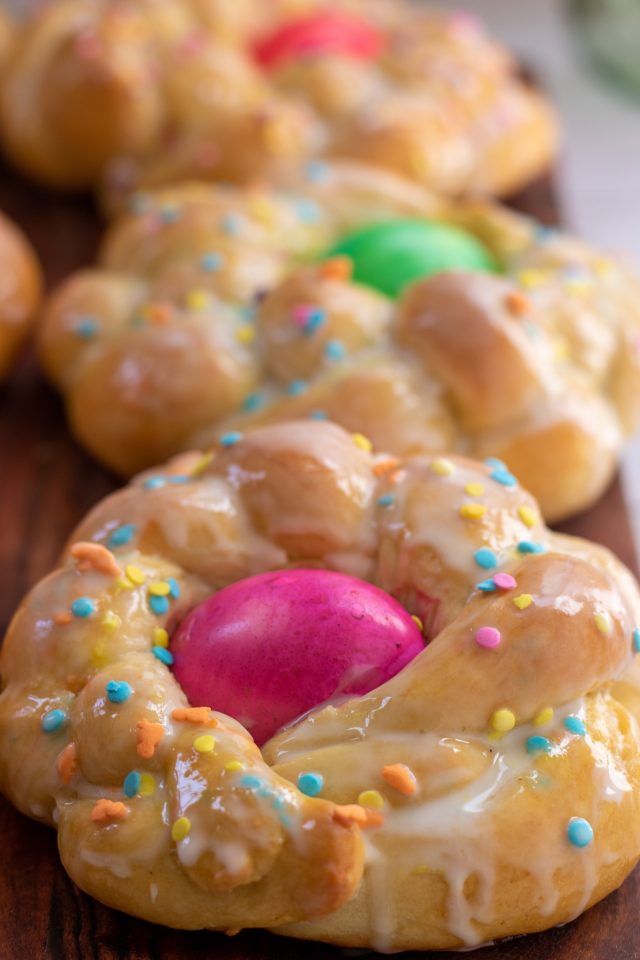
Traditional sweet Italian Easter bread is braided and baked with a hint of lemon and anise. It’s made with Easter eggs baked in the middle, then glazed and decorated with sprinkles.
Italian Easter bread is a holiday tradition that’s been made every year in my family for as long as I can remember.
My mom would have the kitchen smelling of fresh baked sweet bread the day or two before Easter and she’d let my sister and I help her glaze and decorate them with sprinkles.
We’d color our Easter eggs a couple days before and she’d use those in the middle of each braided loaf.
This traditional sweet Italian Easter bread is a version of the easy recipe my mother would use every Easter holiday.
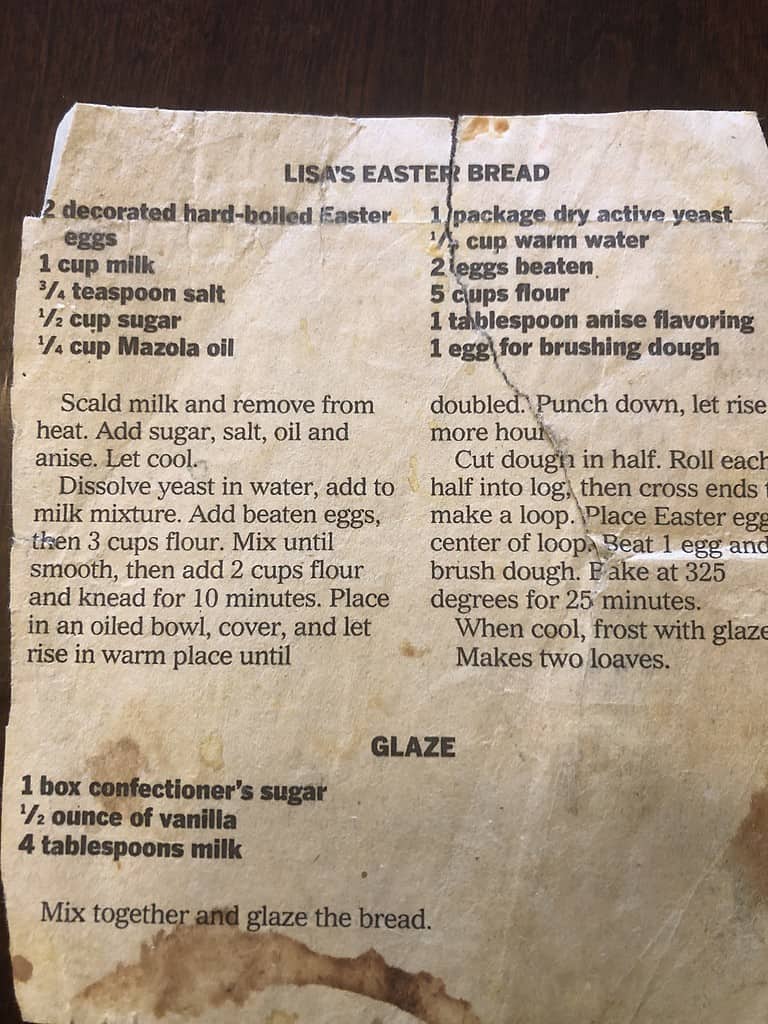
I used my mom's good old recipe (you can see how old it is!) and I also used Brown Eyed Baker's recipe for some adjustments (original recipe here).
The history of Italian Easter Bread:
Easter bread originates back to the Orthodox Christian Church.
It symbolizes the crown of thorns worn by Jesus Christ and the 3 braids together represent the Holy Trinity.
The eggs symbolize birth and life.
What is Italian Easter Bread Called?
Pane di Pasqua means “Italian Easter Bread”
Traditional sweet Italian Easter bread is flavored with either orange or lemon zest and anise extract.
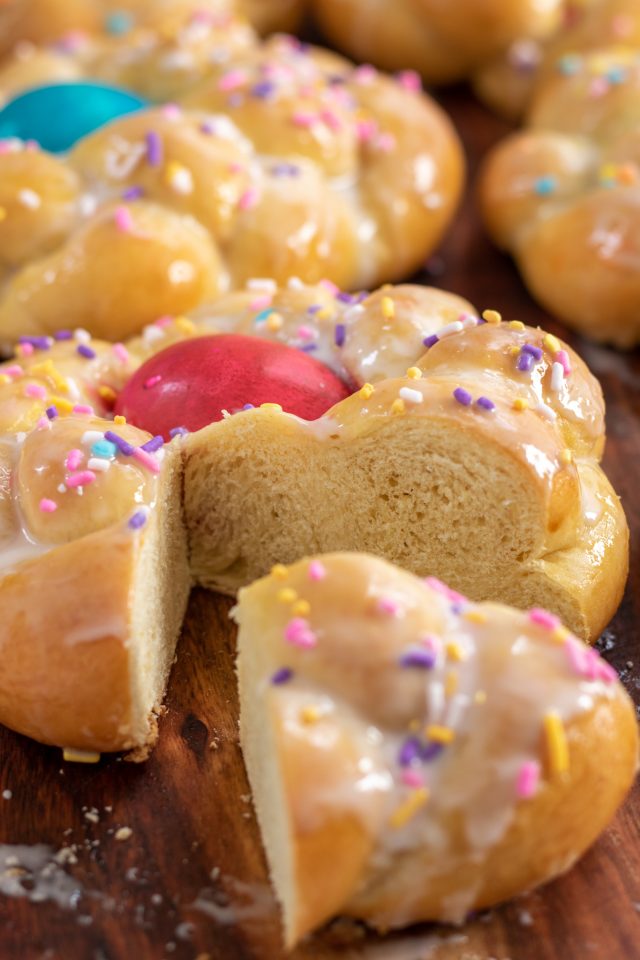
It’s light and fluffy, yet golden and buttery, similar to a brioche dough.
I can remember waking up Easter morning, running in the living room to see what the Easter bunny brought me, and ripping off a piece of the delicious sweet and buttery bread to eat for breakfast.
First, the dough rises until almost doubled in size.
Then, it's divided into 6 equal pieces.
Each of those 6 pieces are divided again into 3 equal pieces and the 3 pieces are rolled into a rope shape and braided together.
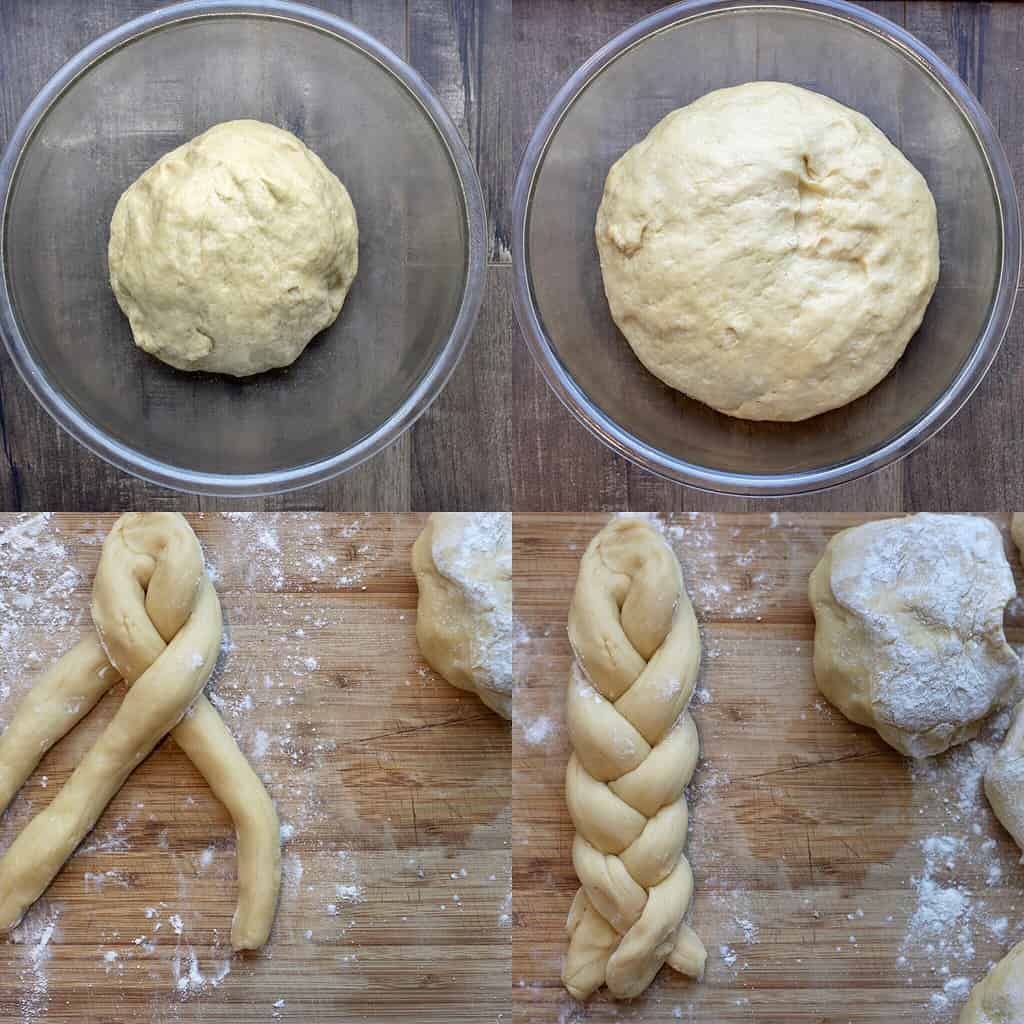
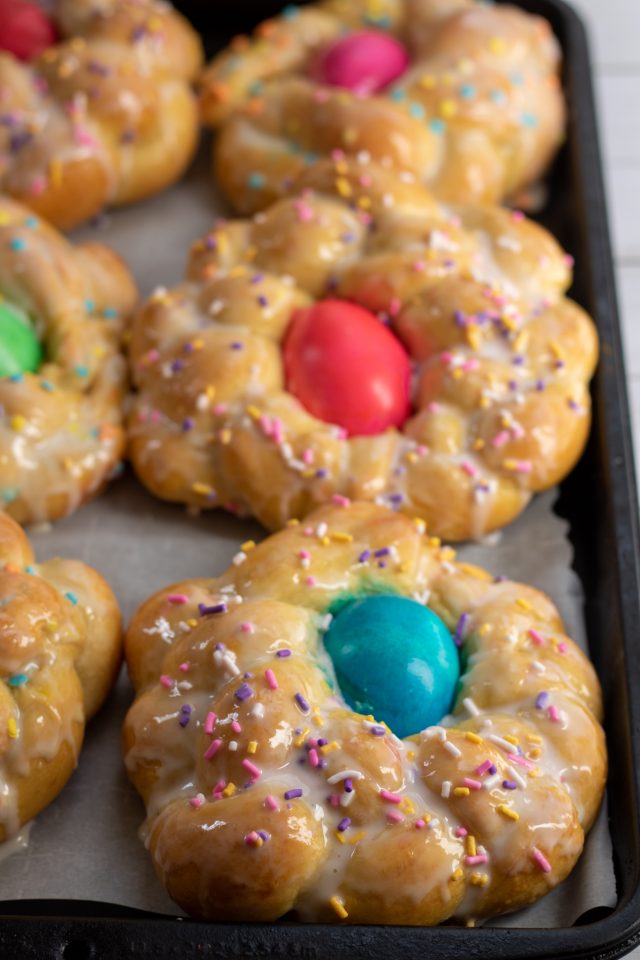
The two ends of the braids are pinched together to form a "wreath" shape.
Then a dyed egg is placed in the middle.
The individual loaves then rise for a second time before baked.
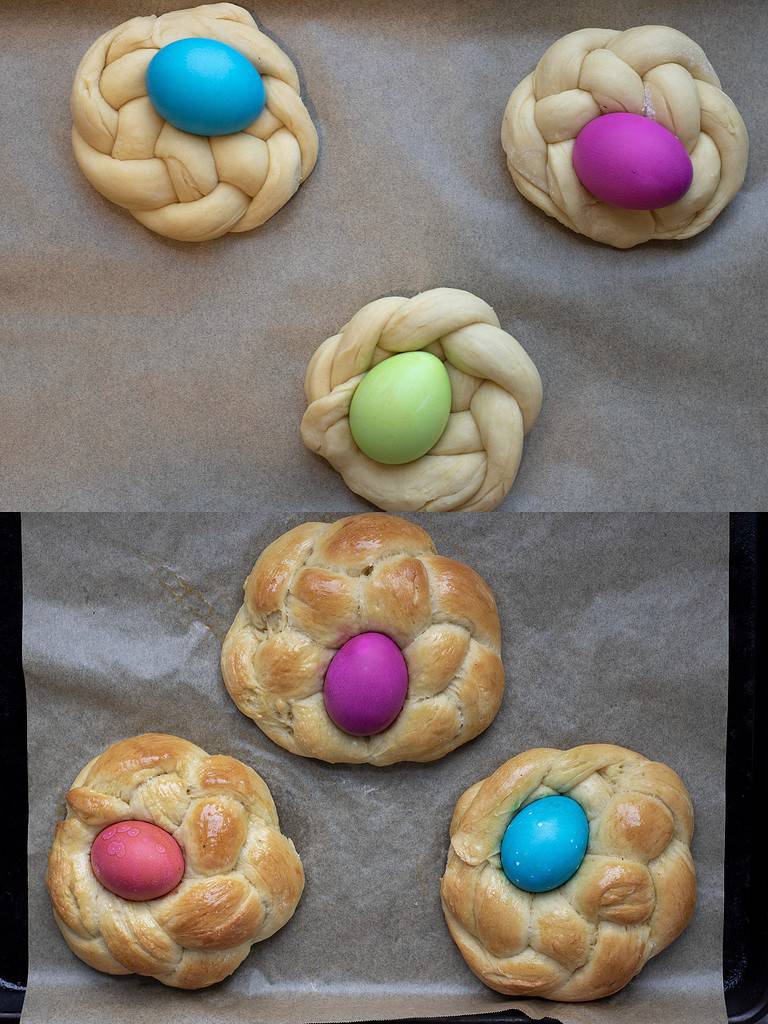
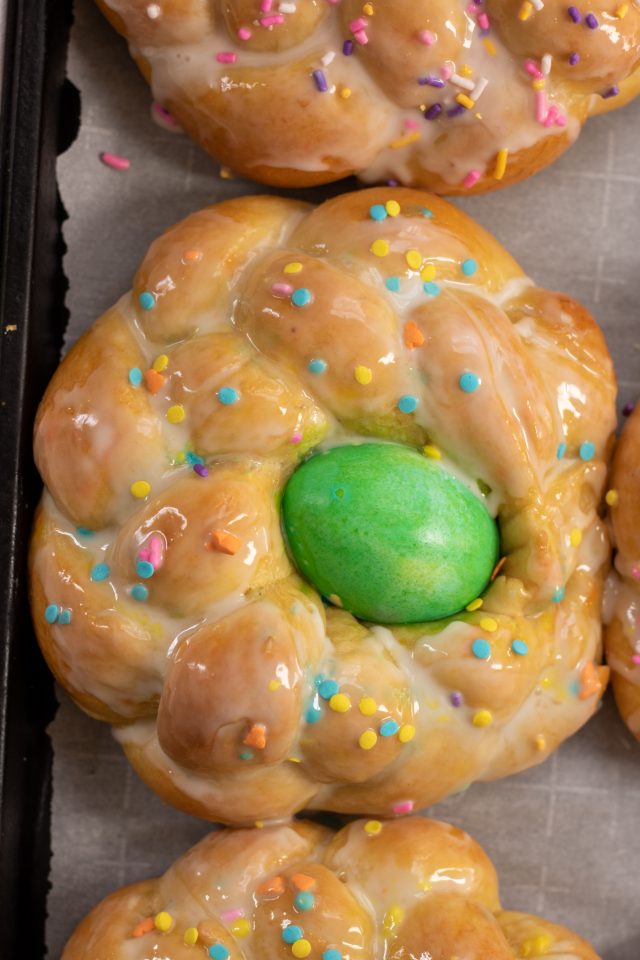
Once the loaves are baked until golden, they're cooled completely then brushed with a powdered sugar/milk glaze.
You can decorate the loaves with colorful sprinkles if you'd like.
I still keep the tradition alive by making these sweet Italian bread loaves every Easter holiday.
They make perfect homemade gifts to give to your Easter dinner host/hostess! Plus, it’s fun to have the kids help with the sprinkles and of course coloring the eggs.
Tips for making sweet Italian easter bread:
- If your yeast isn't foamy after the 10 minutes, it could either mean your milk was too hot and killed it, or the yeast is expired. Be sure your yeast isn't past expiration or that the milk you use is warm to touch and not hot.
- I find that I usually need to add an extra cup of flour after the 4 cups are mixed in. You want the dough to be sticky, but pulling from the sides of the bowl. If it's too sticky you'll want to add another ½ cup-1 cup of flour (this is why I put 4-5 cups in the recipe ingredients!)
- If you don't plan on eating or serving the bread the same day it's baked, I suggest waiting to glaze the loaves because the glaze will get runny and the sprinkles will bleed once covered for too long.
- If you want more medium-boiled eggs in the middle, you can use raw eggs that will bake as the loaves do. You can also use already hard-boiled eggs if you prefer.
- Dough needs a warm environment to rise. If your house is cold or drafty, simply turn your oven on to preheat (only for a minute or two!), just until it gets warm (NOT HOT), then place your dough to rise inside.
Can Italian Easter bread be made ahead of time?
- You can make the dough the day before. After the dough is mixed, place the dough in an airtight container or bowl tightly wrapped with saran wrap. Let the dough rise overnight, then proceed to shaping the dough.
- Easter bread can also be baked and stored in the freezer once cooled for up to three months. Be sure to freeze the baked bread before glazing. I also recommend removing the eggs since they do not freeze well.

Traditional Sweet Italian Easter Bread
Traditional sweet Italian Easter bread is braided and baked with a hint of lemon and anise. It’s made with Easter eggs baked in the middle, then glazed and decorated with sprinkles.
Ingredients
For the Easter Bread:
- ¾ cup whole milk
- ¼ cup granulated sugar
- 1 packet active dry yeast, equals 2 ¼ tsp
- 4-5 cups all purpose flour
- ½ tsp salt, if using salted butter, use ¼ tsp
- ½ cup (1 stick) of butter, melted and cooled slightly
- 4 eggs
- 1 teaspoon anise extract, optional
- 1 teaspoon vanilla extract
- 1 tbsp lemon zest, about 1 lemon
- 6 dyed Easter eggs, see recipe notes
- 1 egg, for egg wash
For the Glaze:
- 1 cup powdered sugar
- 1-2 tbsp milk
- ½ tsp vanilla
- sprinkles for decorating, optional
Instructions
To make the dough:
- Heat milk in small saucepan, stirring occasionally until warm. (It should warm to the touch, not hot or boiling!). If you have a thermometer it should read between 110 and 115 degrees.
- Remove from heat and whisk in sugar until dissolved. Stir in the yeast and let rest for 10 minutes. (The yeast should be slightly foamy on top).
- Meanwhile, in a stand mixer with the dough hook attachment, mix together 4 cups of flour and salt.
- In a small bowl whisk together the melted cooled butter, 4 eggs, vanilla, anise and lemon zest, set aside.
- Once the yeast has bloomed and is foamy, add it to your mixer with the flour, and mix on low speed for about 1 minute until combined (the dough will look shaggy at this point, don't worry about it forming a ball quite yet).
- Add in the egg mixture and mix for a minute or two until combined.
- Increase your mixer to medium speed and keep mixing the dough until a ball starts to form and the dough pulls away from the sides of the bowl. This should take about 5 minutes. If the dough appears to be too sticky, you may need to gradually add an additional cup of flour until the dough comes together. The dough should be soft and slightly tacky.
- Remove dough from bowl and place onto a floured surface. Knead 4-5 times just until smooth. Place in an oiled bowl and cover loosely with plastic wrap or a clean kitchen towel. Keep in a warm place to rise until doubled in sized, about 1 hour. (see recipe notes for making dough ahead*)
- Now is a perfect time to dye your Easter eggs if you haven’t done so already!
To shape the bread:
- Lightly punch dough down to release air. Divide the dough into 6 equal pieces. Divide each of the 6 pieces into 3 pieces for a total of 18 pieces (3 pieces of dough per loaf=6 loaves).
- Working with 3 pieces at a time: roll each piece into a rope about 9” long. Pinch one end together and braid or twist. Join the two ends together and pinch to seal to create the wreath shape. Place a dyed egg in the middle of the loaf (it should fit snug).
- Repeat this process for the remaining 5 loaves.
- Line 2 baking sheets with parchment paper (or lightly grease) and place 3 loaves per sheet. Loosely cover with plastic wrap and place in warm place again to rise, about 1 hour.
- Preheat oven to 350 degrees. Whisk 1 egg in a small bowl. Brush each loaf with egg wash and bake for 20-25 minutes until loaves are golden. Remove and place on cooling rack until completely cooled.
For the Glaze
- Mix together sugar, milk and vanilla. The glaze should be like a thick paste; add more powdered sugar or milk to adjust the consistency as needed.
- Once loaves are completely cool, brush glaze onto the loaves (I use a pastry brush to spread it out evenly). Sprinkle with decorations if desired.
Notes
*If your house is cold or drafty, you can turn your oven on for a minute or two just to get it warm, then shut it off and you have the perfect place for your dough to rest and rise! Just be sure it feels warm and not hot.
*I always use raw, dyed eggs. I find they bake perfectly in the oven with the loaves. They result in a medium boiled egg. If you'd rather use already hard boiled eggs you certainly can.
*If you want to make the Easter bread ahead of time, you can store the cooled loaves wrapped tightly in your refrigerator for up to 3 days. Do not glaze until ready to eat as the glaze will melt and sprinkles will bleed color once refrigerated.
*If you want to freeze the baked loaves you can do so unglazed. I recommend taking the egg out of the loaves because they will not freeze well.
Nutrition Information:
Yield: 6 Serving Size: 1 gramsAmount Per Serving: Unsaturated Fat: 0g
Patti D
March 6, 2024
I made this recipe last night. I let dough rest until this morning. Came out perfect. Thank you. I prefer it a little sweeter, next time I will add a little more sugar to the recipe.
Wine a Little Cook A Lot
Hi Patti, so glad you liked the Easter bread. Thanks for sharing 🙂
Sarah
I’m so disappointed! The same thing happened to me as Megan. I really think there must be a typo because I followed the recipe exactly and the dough was so so dry. I didn’t overmix- the dough just couldn’t come together with the ingredient amounts stated. It was like sand. I added probably a cup and a half of water in tablespoon increments just to get it to form a dough ball but in the end they turned out nothing like bread, unfortunately. It was sad to waste an afternoon on these so I hope the recipe can be corrected for later readers!
Wine a Little Cook A Lot
Hi Sarah, I'm sorry you were disappointed! I did retest the recipe and I had no problem with my dough. That being said, if overmixing isn't the issue, it might be a flour:liquid problem. Sometimes humidity places a part in bread baking. Therefore, I've changed the recipe instructions to add the flour in increments instead of all 5 cups at once. This will control how much flour your bread absorbs and hopefully will avoid any dry dough! Hope this helps.
Susan Carter
Can you make these ahead and freeze them after they are baked?
Wine a Little Cook A Lot
Hi! Yes, these freeze very well, just be sure to freeze not-frosted.
Nancy
I just mixed up this recipe. With approximately 4 1/4 C. of flour. I followed the steps to a tee, and the dough came out wonderful. Perhaps the recipe should not state 4-5 C. It's generally never the latter amount.
L
I followed the recipe exactly, and the "dough" was like cement! Is there a typo in the milk measurement? I am not a novice bread Baker.
Wine a Little Cook A Lot
Hi there, sorry the recipe didn't work out for you. I've updated the recipe instructions to add the flour in increments. This should help the dough from getting too dry.